In order to get to know your camera and get used to the feel and so on, it can be useful, especially at the beginning, to take pictures in automatic mode. But if you want to take more ambitious photos, you should take a closer look at the settings and try out other modes. This does not mean that you have to shoot completely manually and make all settings yourself - although there are situations where this can be useful. There are semi-automatic modes that allow much more room for creativity than fully automatic modes. After all, the camera doesn't know what you want - for example, should the foreground or background be in focus or everything?
Whatever kind of camera you own or if you take pictures "only" with your smartphone, you should know which settings serve which purpose and have which effect.
In the article "Basic camera settings / Part 1" you have already learned what effect the shutter speed and aperture have on a photo. Here we continue with the ISO value, the dependencies of the 3 values among each other and the different camera modes.
ISO
The ISO setting determines the light sensitivity of the sensor. In analog photography, films with different sensitivities were used for this purpose. In digital photography, this parameter can be set as desired for each photo. If the light conditions are sufficient, you should always try to keep the light sensitivity low, e.g. to ISO 100, because with higher light sensitivities (e.g. ISO 800) - depending on the camera - the image quality decreases and "image noise" can occur. So if the available light is not sufficient and no flash should/can be used or the exposure time should be increased, it may be useful to increase the light sensitivity of the sensor.
I may have to accept image noise if high ISO values are the last chance for me to expose the photo sufficiently. But this is very different from camera to camera. On entry-level cameras with an APS-C sensor, you sometimes get noise even at ISO 800, which is close to the limit. With semi-professional or professional cameras with a full-frame sensor, you might not notice the first image noise until ISO 3,200 or later. The best thing to do is to test it with your own camera. Then you know what is the limit for you personally.

Interplay between aperture, shutter speed and ISO
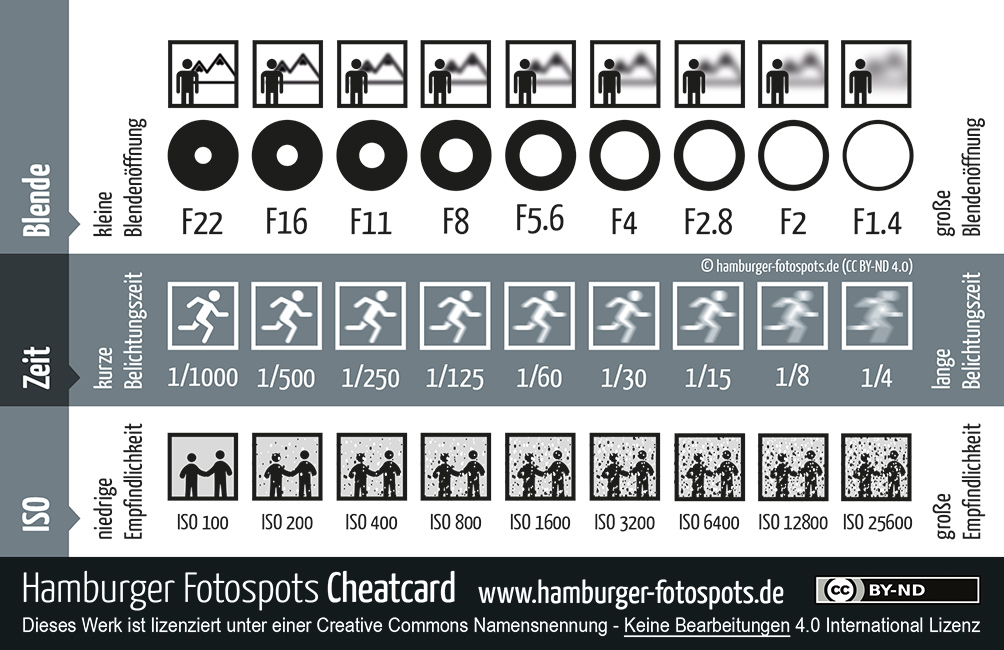
Aperture, shutter speed and ISO all affect the exposure of a photo. So they are always interdependent. If I close the aperture further, I have to expose longer or increase the light sensitivity of the sensor via ISO. The aperture and shutter speed should always be set beforehand, as they affect the composition of the photo. The ISO can then be used for compensation.
So under which lighting conditions I have to increase the ISO depends on how wide I open the aperture and how long I want to expose. In landscape photography I can compensate missing light quite well with longer exposures, as long as my ideas of the photo allow it. For e.g. concert photos, where a flash may not be used and a long exposure is not possible anyway (motion blur), the ISO would have to be increased under much better lighting conditions to catch enough light.
The following illustration shows very clearly in one image how aperture, shutter speed and ISO affect a photo:

The practical thing about f-number, shutter speed and ISO is that the step sizes from one value to the next are the same when the values are changed. This means that if I increase the exposure time of my camera by one step (more light) and e.g. close the aperture one step further (less light), I have the same exposure of the image. Changes are usually possible in whole or third steps (depending on camera and setting).
The exposure of the photo always remains the same. Examples expressed in numbers:
| Aperture | Exposure time | ISO | Effect |
| f4 | 1/200 | 200 | Initial setting |
| f4 | 1/400 | 400 | faster shutter speed/exposure time |
| f8 | 1/100 | 400 | Larger sharpness range (depth of field) |
| f4 | 1/100 | 100 | lower image noise |
Different camera modes
| Auto | Automatic | Auto |
| Av | Aperture priority | A |
| Tv | Shutter priority | S |
| P | Programmautomatic | P |
| M | Manuell | M |
Automatic
There is probably not much to write about, the camera takes all the settings and - from a technical point of view - makes the best of the motif situation.
Aperture priority
For me as a landscape photographer after the manual mode, probably the most used one. The aperture is selected manually, the other parameters are set automatically to expose the image sufficiently.
Shutter priority
The exposure time is fixed, aperture and co. are set automatically by the camera. This setting is especially useful if you want to take a short exposure, e.g. if you want to photograph a moving object (e.g. an athlete doing sports) or if you want to take a longer exposure to capture the water movement in a waterfall.
Programmautomatic
Depending on the camera there are other automatic modes that are preset for certain situations, e.g. landscape, portrait, night etc. The difference to the automatic mode is usually that in addition to aperture, exposure time and ISO, the color profile, sharpness and other parameters are also preset differently.
Manuell
In manual mode, all parameters are set manually. It takes some practice to ensure that your photos are sufficiently exposed, the desired effect is achieved and the quality is still good (e.g. noise from ISO, motion blur, insufficient depth of field). When using neutral density filters (later tutorial) you will have to use this mode if you want to achieve reasonable results.